
Getting Started with Python Workflows in ArcGIS Pro
/
Getting Started
Standalone Python scripts are great for many GIS tasks, some of which can be automated. Occasionally, however, a task still requires direct interaction with desktop GIS software.
For example, you cannot accomplish some functionality available in ArcGIS Pro using the Arcpy Python modules alone. One limitation is that Arcpy and the ArcGIS API for Python cannot maintain attachments when appending features from one feature service to another; this task requires Pro. Other times, you simply need the desktop software to export maps to PDF, adjust symbology, or publish map services.
This blog will briefly discuss how to start using Python to work with your existing ArcGIS Pro projects. This is a quick introduction to the topic, so reference the Esri documentation for detailed syntax explanations and workflows.

Understanding the Arcpy Mapping Module
To work with Pro projects directly in Python, use the Mapping module within the Arcpy site package. This standard Arcpy module is installed automatically when installing ArcGIS Pro on the computer. The Mapping module can be used in both standalone scripts and directly within the Python window of ArcGIS Pro.
The Mapping module I am referring to specifically here is the Mapping module for ArcGIS Pro. Be aware that ArcMap uses an older version of the module with the same name, but I will not be discussing the older module. The syntax is different, and it does not work with ArcGIS Pro.
One important note: you cannot create a new project with the Mapping module. You must work with an existing Pro project. You can copy a project or save a project as a different name, but you must start with an existing project in either case.

Step 1: Accessing a project
After importing the Arcpy site package in a script, the first task with any Mapping workflow is to access your project. Depending on whether ArcGIS Pro is open or accessed through a standalone script, you can do this one of two ways. The syntax for accessing a project is:
arcpy.mp.ArcGISProject({path to project on disk})The full path to the project includes the aprx extension. If you are accessing the project using Arcpy from within an open project on the desktop, use the parameter "CURRENT" instead of the path to the project. An example of both ways to access the project are shown below.

Figure 1. Accessing Pro project through standalone script.

Figure 2: Accessing Pro directly through Python window in ArcGIS Pro.
When the project is accessed using the ArcGISProject method, you can assign it to a variable. Now, any time you need to run a method or perform some action with the project, you reference the variable. As mentioned above, you can also access your project directly in the ArcGIS Pro interface using the Python window. The syntax is slightly easier because all you have to reference is "CURRENT" to access the currently open project. Regardless of how you access the project, you should delete the temporary project object at the end of the script to remove any locks that the script created when accessing the file.
Step 2: Accessing items in a project
Now that you have accessed the project, what are some things you can do? The first step will be to access the items within your project to change settings, manage data, or export maps. First, you will see how to access the items and then how to perform some common tasks. The examples below show workflows from a standalone script. The only difference from a workflow done within the application is how you access the project.
Items that can be accessed and used in ArcGIS Pro using the Mapping module include layers, maps, and layouts. The methods and properties available change significantly depending on what type of item is accessed. There are even significant differences between things like raster and vector layers in the table of contents. Even though they are both layers, their methods and properties differ significantly due to the difference in data structures and how ArcGIS Pro deals with them. There is also a hierarchy to accessing certain items. For example, you must first access a map to access a layer within that map.
Let's look first at how to access a map. To do this, use the following syntax:

Figure 3: Accessing a map.
Here we use the "listMaps" function to access the maps within the project. This specific way accesses a map called "Building_Site". The index of [0] returns the first map that matches the name in the listMaps parameter. If the parameter is left blank and no index is specified, the listMaps function would return a list of all maps within the project. Using this list, the maps could be iterated to perform actions on all maps. In Figure 3, the listMaps function only returned one map matching our desired name, so there is no need to iterate.
Next, to access the layers in that map, we can use the listLayers method on the map class we accessed in the previous step. Let's say that we received a Pro project with many layers, but we want to know if the connections to those layers are broken. If the layer connection to the data is broken, we want to correct that issue. First, we return a list of all layers in our selected map.

Figure 4: Accessing the layers.
After the list of layers is retrieved, you can begin iterating through the layers to read properties or perform actions. In this instance, we simply want to return the names to the console of the broken layers. The "isBroken" property returns a Boolean indicating if the data source is broken. The "name" property returns the layer name in the table of contents.

Step 3: Reading and modifying project items
Once you have accessed an item, you can begin reading or modifying the properties. As previously mentioned, the properties vary depending on which item type you are accessing. Layers, for example, have symbology properties but maps and other items do not. Even layer properties vary depending on the type of layer. Raster layer properties are different than those of vector layers. Even vector layers vary slightly depending on whether the data type is a point, line, or polygon.
To demonstrate how to read and make changes to these properties, let's look at how to work with vector layer symbology within a project. You must access the Symbol class to make changes to how a layer looks in the map frame. You can change a layer's symbol class, and then that class is applied to the layer. In this example, we are changing the color of a polygon layer's fill to green.

Figure 5: Changing the "fill" color of polygons.
After accessing the specific layer, you access its symbology on line 9. The color property of the symbol class of the renderer is changeable. In this instance, we are using RGB color values to change the polygon fill color to green. The fourth number on line 10 specifies the alpha or opacity percentage. In this case, it is 100 percent, meaning that the fill is completely visible, and no transparency is applied. You could make the fill completely invisible by changing this attribute to 0. Once you change the color property of the symbol class, you must then apply the symbol class to the layer for the change to happen.

Step 4: Locks and file saving
If this is a standalone script and there are no more tasks to complete, you would save the project and then delete the aprx object to remove any locks on the file. If you do this in the Python window of ArcGIS Pro, the changes would automatically appear onscreen; there is no need to refresh the table of contents as was previously required in ArcMap. You should still delete the aprx object to prevent locks. To save the project, you can use either the save() method or the saveACopy([new path and name]) method. Since we want to keep the same project and not make a copy, we can simply close out the script in the following way.

Figure 6: Saving and removing the reference to the project.
As mentioned, deleting the project object removes any locks on the project file; it does not delete the actual project file.
Using Python scripts for geoprocessing tasks
This completes the brief introduction to working with a Pro project using Python. Most workflows that use Python to work with projects will follow this pattern:
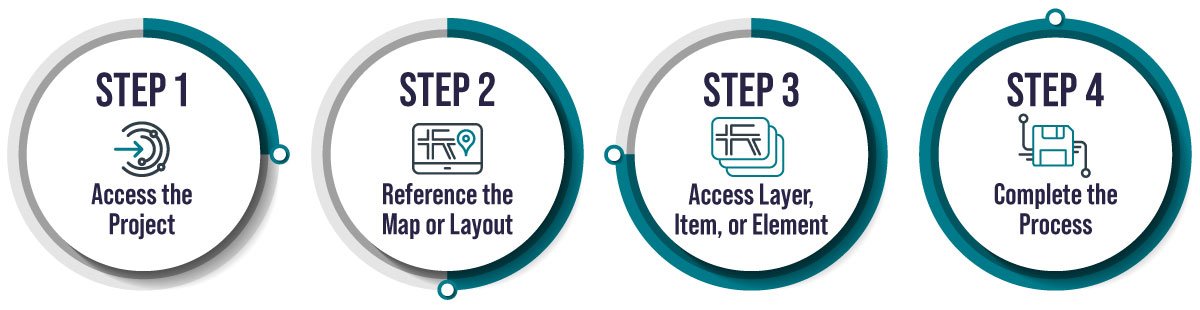
Access the project.
Reference the map or layout.
Access the layer or layout item and note that each map, layout, layer, or element has its own properties. Some properties can be read, while others can be modified.
Complete the process by saving the project and deleting the project object.
Regardless of the process, always reference the Esri documentation for detailed explanations of the methods and properties available.